 |
 |
 |
| Basic Screen Tutorial |
| Frist round For creating an alarm screen |
 |
| 2.Let us actually draw a picture ! |
|
| 1-5) Place Q tag selection key |
|
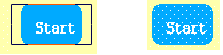
| Finally place [Q tag selection key] such as [Start], [Up], or
[Down]. |
| |
|
| 1.Draw a switch on the screen in which Q tag is
placed. |
|
 |
| |
| 2.Select the [T tag] icon, |
 |
|
|
| |
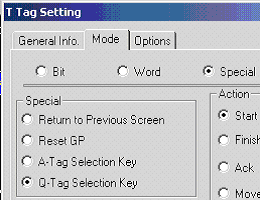
| 3.Draw a switch on the screen in which Q tag is
placed. |
|
| Select [Special], and click [Q tag selection key]. |
|
 |
| |
| 4.Select the type of a switch to be created. |
|
 |
|
| •Q tag selection key types |
| The function names and the actions of Q tag selection key will be introduced
in the table below. It's not necessary to place all types of Q tag selection
key. Place the key you like. (However, the [Start] key is always necessary.) |
|
| [Start] |
This key begins operations of Alarm. Pressing this key causes
a cursor to appear in the Q tag display area. Before using other Q tag selection
keys, be sure to touch the [Start] key.→Freeze Mode
|
| [Finish] |
This key ends key entry operations as the cursor disappears. |
| [Ack] |
[Ack] |
Make the [Ack] state for Alarm Message.Select alarm messages and touch the
[Ack] key, and you'll be able to change the color of the alarm messages into
the [Ack] color and display the Ack time. (When selecting History, Log) |
| [Ack All] |
All alarm messages displayed in Q tag become the Ack state. |
| [Move] |
[Up] |
All alarm messages displayed in Q tag become the Ack state. |
| [Down] |
Moves the cursor up by one line. |
| [Roll Up] |
With this key, the specified number of lines' display data will be rolled
up. |
| [Roll Down] |
With this key, the specified number of lines' display data will be rolled
down. |
| [Clear] |
[Delete] |
Erases the selected alarm messages. |
| [Delete All] |
Erases the all displayed alarm messages. |
| [Clear Recovered Alarm] |
Deletes the selected acknowledged alarm messages. |
| [Clear Acknowledged Alarm] |
Deletes the selected acknowledged alarm messages. |
| [Clear All Recovered Alarms] |
Deletes all recovered alarm messages. |
| [Clear All Acknowledged Alarms] |
Deletes all acknowledged alarm messages. |
| [Clear All Numbers] |
Used when Extended Function of Q tag is used.
As for the details, refer to Application. |
| [Clear Option Number] |
| [Clear All Times] |
| [Clear Option Time] |
| [Sort] |
[Sort Date] |
Used when Extended Function of Q tag is used.
As for the details, refer to Application. |
| [Sort Number] |
| [Sort All Time] |
| [Sort Alarm] |
| [Sort Level & Date] |
| [Sort Level & Number] |
| [Sort Reverse Alarm] |
| [Sub-display] |
Used when displaying the detailed screen according to each alarm. |
| [Alarm information acquisition] |
Used when Extended Function of Q tag is used.
As for the details, refer to Application. |
|
| |
| 5.Click [OK], put T tag over the picture of the
switch created in ?. |
|
 |
| |
| That's all for the settings of Q tag selection key. |
| |
|
| |
|
|
|
|
| |


 沪ICP备05028659号-3